( 참고 : Fastcampus 강의 )
[ YOLO v2 & YOLO 9000 ]
1. YOLO v1 (2016) 복습
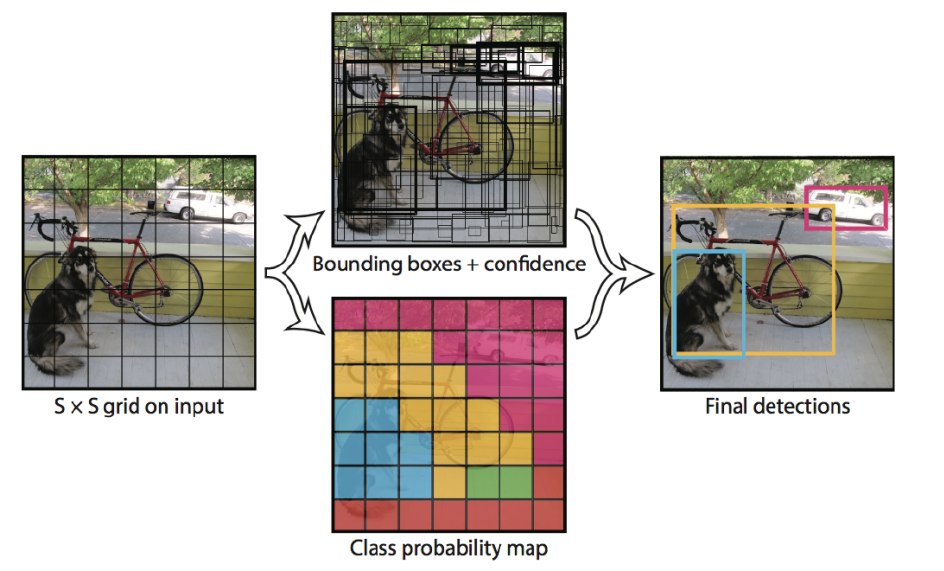
- \(7 \times 7\) grid cell로 이미지를 나눔
- grid 당 bounding box 2개
- bounding box의 confidence score & class probabillity를 곱함
- non-maximal suppression을 통해 최종 object detection
- feature extraction을 위한 CNN 모델로 GoogLeNet 사용함
2. YOLO v2 & 9000 (2017)
Classification 정확도를 유지하면서도, Recall & Localization 개선!
(1) Better : 정확도 \(\uparrow\)
-
a) Batch Normalization
-
학습이 빠르게 수렴하도록 & regularization 효과 O
-
dropout은 사용 X
-
-
b) High Resolution Classifier
-
YOLO v1 :
-
pretrain) Darknet 사용, size 224x224
-
detection task) size 448x448
\(\rightarrow\) Object detection task를 학습시, 새로운 입력 이미지의 resolution에 적응해야 함
-
-
YOLO v2
- pretrain & detection task) 모두 size 448x448
\(\rightarrow\) 4% 정도의 improvement
-
-
c) Convolutional with Anchor boxes
-
YOLO v1 :
- 각 grid cell의 bounding box의 좌표가 0~1 사이의 값 & optimize
-
Faster R-CNN
- 9개의 anchor box 사용 & bounding box regression
-
YOLO v2
-
anchor box 사용
-
좌표보다, bounding box offset을 예측하는게 더 학습에 용이
( 정밀도는 살짝 줄지만, Recall는 늘어남 )
-
-
-
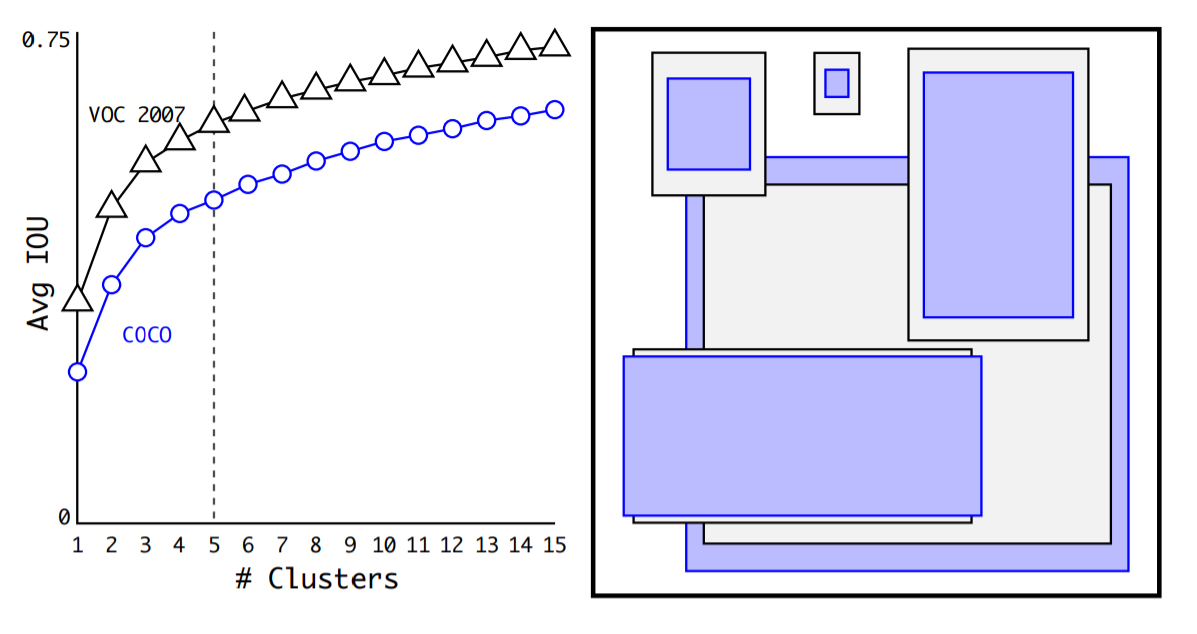
d) K-means Clustering
-
anchor box 중, 비슷한 anchor box를 cluster
-
box들 간의 distance : 1-IOU(box,centroid)
-
-
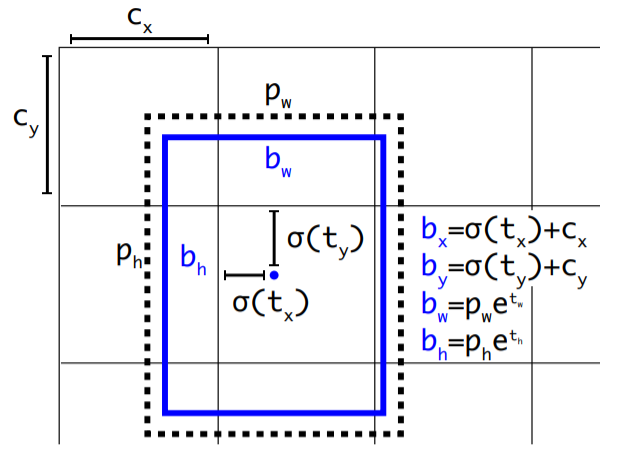
e) Direct location prediction
-
YOLO + anchor box? 불안정한 모델 학습…이를 해결하기 위한 것!
( \(t_x\),\(t_y\) 등의 계수에 제한된 범위 X \(\rightarrow\) Anchor Box가 image 내 아무 위치에나 있을 수 있다는 문제점 )
-
해결책 : bounding box regression을 통해 얻은 \(t_x\), \(t_y\) 에 sigmoid 씌워서 0~1사이로 범위 조정
-
-
-
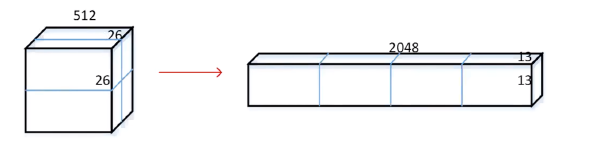
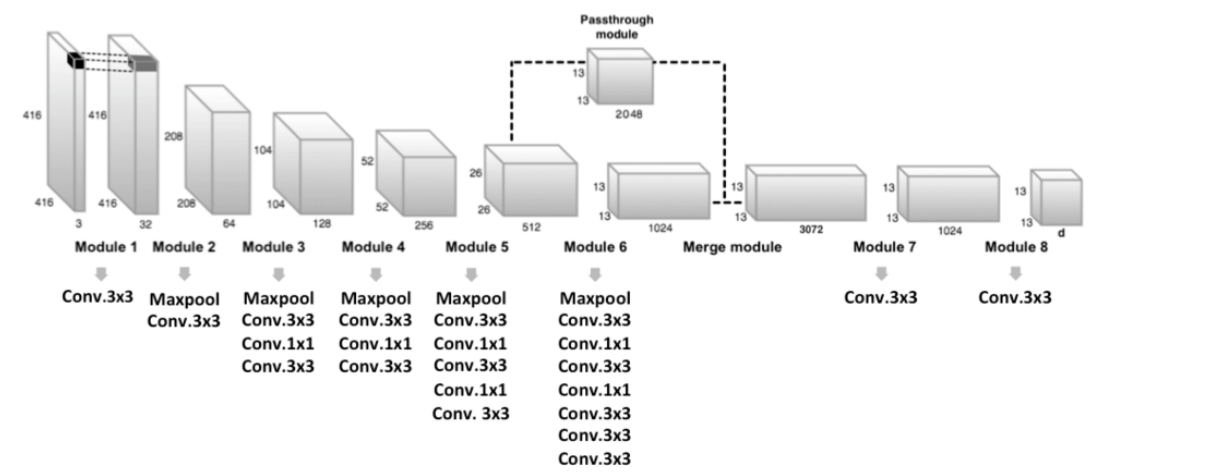
f) fine-grained features
-
YOLO v2의 최종 output 크기 : 13x13
( 문제점 : 작은 물체를 인식하기는 어렵다! )
-
해결책 :
- step 1) 마지막 pooling 이전의 26x26(x512) 크기의 feature map을 우선 추출
- step 2) 해당 feature map을 4개로 분할 후 concatenate
- before) 26x26x512
- after) 13x13x2048
-
-
g) Multi-Scaling Training
-
input image size를 고정시키지 않고,
10 batch마다 input image size를 랜덤하게 선택하여 학습
-
more robustness!
-
(2) Faster : Detection 속도 \(\uparrow\)
-
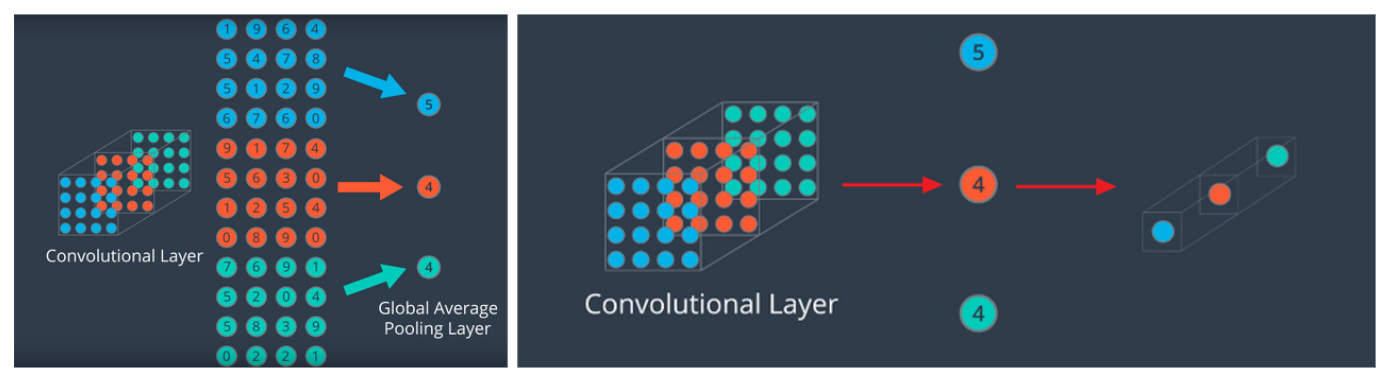
a) DarkNet-19
-
YOLO v1 : 마지막에 FC layer 사용 \(\rightarrow\) 너무 많은 파라미터 수, slow
-
이를 개선하기 위해, Darknet-19의 맨 마지막 layer에는 global average pooling을 사용
( FC 제거를 통한 파라미터 수 감소 & 속도 UP )
-
-
-
b) Training for Classification
-
ImageNet 1000개의 class & 160 epoch
-
448x448으로 변경
-
data augmentation 수행
-
-
c) Training for Detection
- 마지막 conv layer를 제거 & 3x3(x1024) conv layer + 1x1 conv layer로 대체
(3) Stonger : 더 많은 Class 예측
classification 데이터 & detection 데이터를 함께 사용하여 학습
\(\rightarrow\) 더 많은 class를 예측가능! ( YOLO 9000부터 도입 )
BUT, classification 데이터 & detection 데이터는 성격이 다르다.
- classification 데이터 : 세부적인 객체에 대한 정보
- ex) 다양한 종류의 개 = “poodle”, “bull dog”…
- detection 데이터 : 일반적이고 범용적인 객체에 대한 정보
- ex) 모든 종류의 개 = “dog”
따라서, 이 둘을 함께 학습시키게 될 경우, model이 “dog”와 “poodle”을 서로 다른 배타적인 class로 분류할 수도!
이를 해결하기 위한….
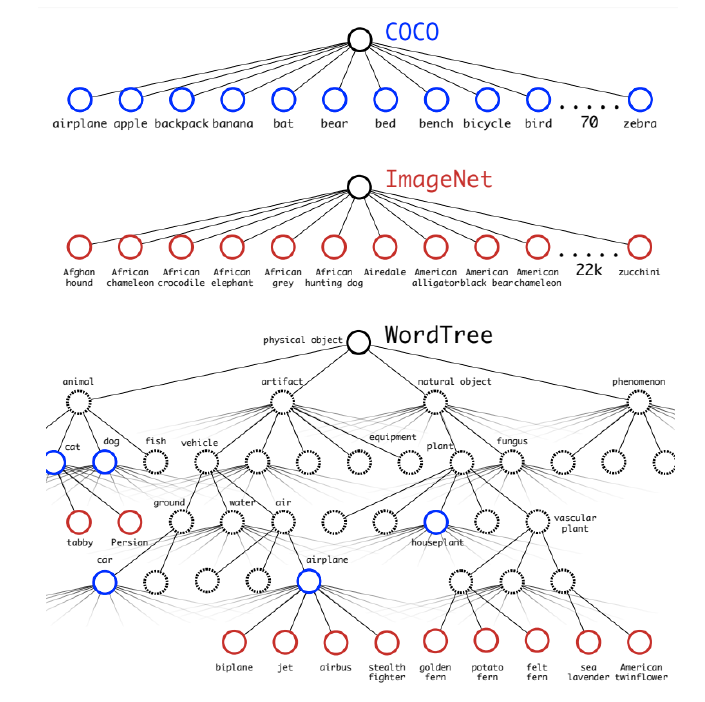
- a) Hierarchical Classification
-
classification 데이터 : ImageNet ( 세부적이다 )
-
detection 데이터 : COCO ( 범용적이다 )
-
계층적 구조를 사용하여, COCO 데이터가 ImageNet 데이터보다 tree의 상위에 있도록!
-
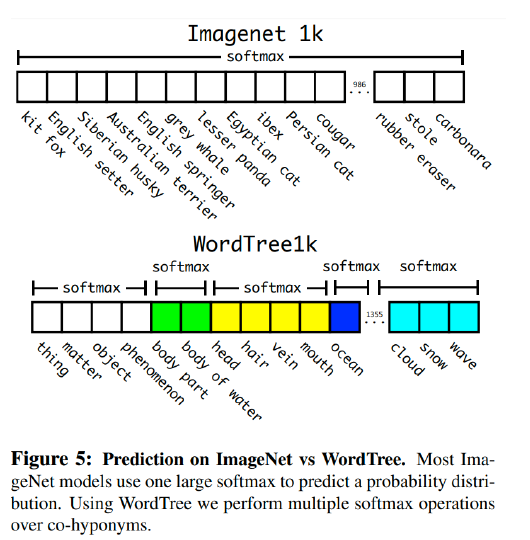
- b) Dataset combination with Word-tree
- predict conditional probabilities at every node of tree!
- P(강아지 A \(\mid\) 강아지 ) , P(강아지 B \(\mid\) 강아지 ) ,…..
- P(강아지 A) = P(강아지 A \(\mid\) 강아지 ) \(\times\) P(강아지 \(\mid\) 동물)
-
-
- predict conditional probabilities at every node of tree!
- c) Joint classification and detection
- COCO 데이터 & 상위 9000 class의 ImageNet 데이터
- detection image : 일반적인 back-prop
- classification image : class 정보만 있음. 상위의 level 개념에 대해서만 back-prop