
( 출처 : https://wikidocs.net/book/7060 )
1. Git 시작하기
1-1) 저장소 생성 및 설정
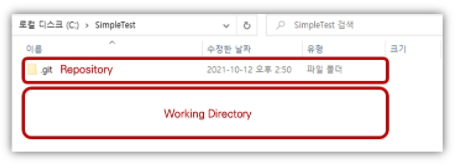
(1) 프로젝트 폴더 생성 ( SimpleTest )
mkdir SimpleTest
cd SimpleTest
(2) 저장소 생성하기 ( git init )
-
빈 git 저장소가 초기화됨
( Initialized empty Git repository )
git init
-
.git이라는 폴더가 생성됨-
역할 : 작성할 프로그램의 저장 이력이 기록되는 곳
( 즉, 이거 삭제하면 원하는 시점으로 복원 불가! )
-
ls -al
(3) 사용자 설정하기 ( git config )
git config user.name "User1"
git config user.email "User1@gmail.com"
잘 되었는지 확인하기
git config --list
[TIP] 전체 저장소의 설정을 동일하게 하려면?
- 즉, PC안의 모든 저장소의 user를 동일하게!
git config --global user.name "User1"
git config --global user.email "User1@gmail.com"
.git 폴더 내부에, config 파일을 열어보면, 위에서 등록한 user name & email이 잘 나와있다.
[ 요약 ]
git init: 저장소(repository) 생성git config user.name [작성자 이름]: 작성자 이름 설정git config user.email [이메일 계정]: 작성자 이메일 설정git config --list: 저장소 설정 전체 출력git config --get [설정항목]: 일부 설정항목만 출력(ex : git config –get user.name)git help [커맨드 이름]: 도움말
1-2) git의 동작 개념
(1) git의 3가지 작업 영역

1) working directory
.git폴더 제외한 공간- 파일/코드가 저장되는 공간
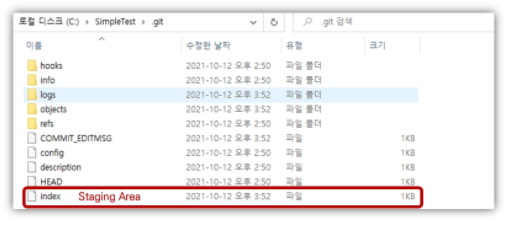
2) staging area
.git폴더 하위에 존재 ( 파일명 :index)- commit할 대상 파일들이 위치하는 영역
3) repository
.git폴더- commit된 파일들이 존재하는 공간
(2) git이 관리하는 3가지 파일 상태
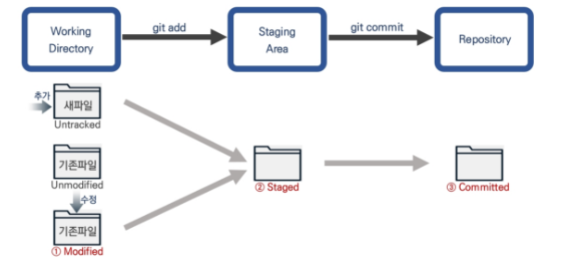
1) modified
- 수정은 O , add/commit은 아직 X
2) staged
- staging area에 있는 상태 ( add는 O )
3) committed
- 변경 사항 기록 완료 ( add/commit 모두 O )
[TIP] staging area가 필요한 이유?
이유 1) 일부 파일만 commit하고 싶을 수 있음
이유 2) 충동을 수정
- 둘 이상의 commit을 병합해야하는 상태 발생할 수도!
- 파일 by 파일
- 파일별 충돌을 해결할 때마다, 중간에 commit을 해두기
이유 3) commit을 수정
-
commit 이력 수정 시, 파일 상태를 stage로 내린 뒤,
바꿀 사항만 바꾸고 commit하면 효율적
(3) 실습
step 1) 파일 추가 ( ex. ReadMe.md )
step 2) git status -> Untracked File이 존재한다고 뜸
$ git status
---------------------------------------------------
# (1) On branch master

# (2) No commits yet

# (3) Untracked files:
  (use "git add <file>..." to include in what will be committed)
        ReadMe.md

# (4) nothing added to commit but untracked files present (use "git add" to track)
해석 :
- (1) 가장 default 브랜치는 master branch
- (2) 아직 commit한거 없음
- (3) add안했기 때문에, track 대상 없음
- 이를 위해,
git add해야!
- 이를 위해,
- (4) commit할 파일 없음 ( add도 안했으니까 )
step 3) git add [파일명]
git add ReadMe.md
step 4) git commit -m [메세지]
git commit -m 'added Readme File'
step 5) git status 로 중간점검
$ git status
----------------------------------------
# (1) On branch master
# (2) nothing to commit, working tree clean
해석 :
- (2) commit 했기 때문에, 더이상 할 거 없음
step 6) 파일 수정하기 & git status
$ git status
-----------------------------------------
# (1) On branch master
# (2) Changes not staged for commit:
  (use "git add <file>..." to update what will be committed)
  (use "git restore <file>..." to discard changes in working directory)
        modified:   ReadMe.md

# (3) no changes added to commit (use "git add" and/or "git commit -a")
해석 :
- (2) 관리중인 파일에, 수정사항이 발견됨!
step 7) git add, git commit 하기
git add ReadMe.md
git commit -m 'modified file'
[ 요약 ]
- git의 작업영역 3가지
- Working directory, Staging area, Repository
- git의 파일상태 구분 3가지
- Modified, Staged, Committed
명령어
git status: git이 인식하고 있는 상태정보 출력git add [파일명 또는 디렉토리명]: 수정사항이 있는 특정파일 또는 디렉토리 내 파일 전체를 Staging area로 올리기git add .: Working directory 내에 수정사항이 있는 모든 파일들을 Staging area에 올리기git reset [파일명]: Staging area에 올렸던 파일 내리기git commit: 이력 저장(commit)git commit -m [메시지]: vim을 사용하지 않고 인라인으로 메시지를 추가하여 commit
1-3) 빈 프로젝트 생성 & 기록
step 1) Working directory에 이런 저런 파일 넣기
step 2) git add * & git commit -m '메세지'
step 3) .gitignore파일 생성하기 ( 아래 참고 )
step 4) git add * & git commit -m '메세지'
.gitignore
- 무시할 파일/경로 목록 ( tracking의 대상에서 제외 )
touch .gitignore
- 생성된
.gitignore에 무시할 파일/경로 입력