
[따배쿠] 12. Ingress
( 참고 : 따배쿠 https://www.youtube.com/watch?v=6n5obRKsCRQ&list=PLApuRlvrZKohaBHvXAOhUD-RxD0uQ3z0c )
Contents
- Ingress의 이해
- Ingress 컨트롤러 설치
- Ingress Rule 생성
- 실습 : 웹페이지 구현하기
1. Ingress의 이해
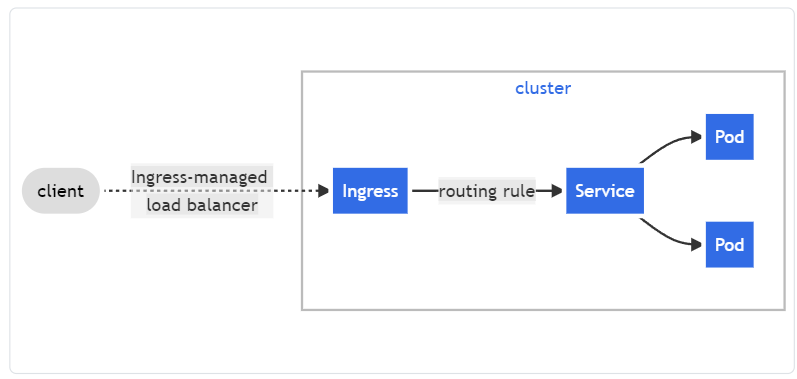
Ingress : 쿠버네티스가 제공하는 API 중 하나로,
- 역할 : HTTP/HTTPS를 통해, cluster 내부의 서비스를 외부로 노출시켜줌
- 기능
- 1) Service에 외부 URL을 제공
- 2) Traffic을 Load Balancing
- 3) SSL 인증서 처리
- 4) Virtual hosting을 지정
Ingress 동작 방식
-
Service들을 통합해서 관리해서, 서비스에 대한 단일 진입자를 만들어주는 역할
-
Service들을 묶어서, 하나의 rule을 만듬 ( = Ingress Rules )
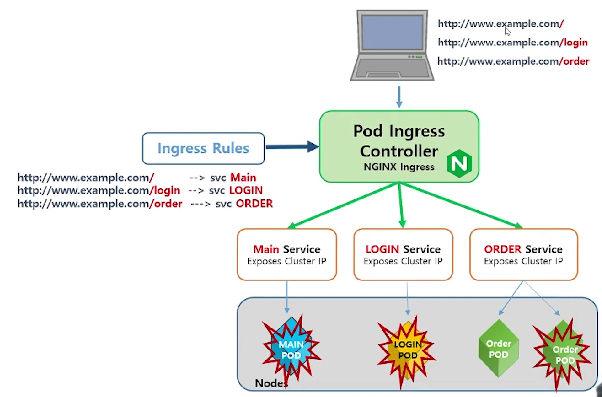
client의 접속 url에 따라, 이에 맞는 service로 연결을 해줌!
http://www.example.com/-> Main URL로 연결http://www.example.com/login-> Login URL로 연결http://www.example.com/order-> Order URL로 연결
2. Ingress Controller 설치
( https://kubernetes.io/docs/concepts/services-networking/ingress/ )
Ingress Controller에는 다양한 종류가 있음
- ex) NGINX Ingress Controller
Install Guide에 따라 설치하기
- 여러 Contents 중, “Bare metal” 버전 선택
설치 과정
- 1) namespace 생성
kubectl create ns ctrl
- 2) NGINX ingress controller 설치
helm install nginx-ingress stable/nginx-ingress --version 1.40.3 -n ctrl
kubectl get pod -n ctrl
kubectl get svc -n ctrl
- 잘 설치된 것을 확인할 수 있음
3. Ingress Rule 생성
여러 Worker Node들 안에, 아래의 pod들이 동작중이다.
- main :
marvel-collectionx 1- service :
marvel-service로 묶음
- service :
- pay :
payx 3- service :
pay-service로 묶음
- service :
Pod Ingress Controller
- controller 종류 : Nginx Ingress
- Ingress Rules를 생성하여, 다음의 services들을 관리함
- 1)
marvel-service - 2)
pay-service
- 1)
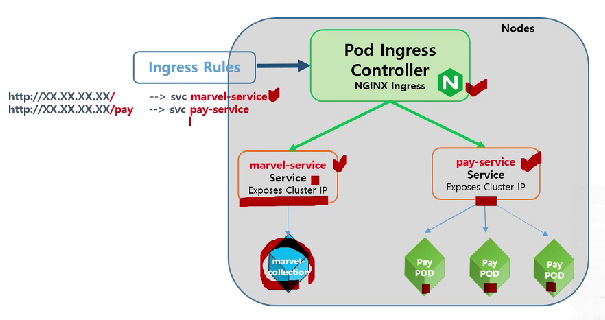
ex) http://xx.xx.xx.xx/pay로 접속 시, pay service의 3개의 pod 중 하나로 연결시켜줌
4. 실습 : 웹페이지 구현하기
[ 준비 과정 ]
1) kubectl create -f deploy.yaml
2) kubectl get namespaces
- ingress-nginx 라는 namespace가 생성된 것을 알 수 있다
3) kubectl get all -n ingress-nginx
- 해당 namespace 하에 있는 모든 리소스들 확인 가능
[ 웹 페이지 구현하기 ]
default namespace 치환 ( config 파일을 수정해야! )
1) kubectl config view
- 어떠한 context들이 있는지 확인 가능
- 현재 default context가 뭔지 확인 가능
2) kubectl config set-context ingress-admin@kubernetes --cluster=kubernetes --user=kubernetes-admin --namespace=ingress-nginx
- context 추가해서 넣어주기
kubectl config set-context <context 이름 지정> --cluster=kubernetes --user=kubernetes-admin --namespace=<namespace 이름>
3) kubectl config view
- context가 추가된 것을 확인할 수 있음
4) kubectl config use-context ingress-admin@kubernetes
- 방금 추가한 context로 switch하기
kubectl config use-context <context 이름>
5) kubectl current-context
- default ns가 바뀐 것을 확인할 수 있음
6) kubectl get all
- default가 바뀌었으므로,
kubectl get all -n=ingress-nginx와 동일
이제 Ingress Rule을 적용해줘야함.

-
위와 같은 rule을 적용하기 위해, 우선 두개의 service
- 1)
marvel-service - 2)
pay-service
가 생성되어 있어야 한다.
- 1)
-
즉, 크게 보면
- step 1) 웹 서비스(service) 동작
- step 2) Ingress 동작
순으로 진행해야 한다.
웹 서비스(service) 동작
cat marvel-home.yaml의 구성
- Deployment : (name)
marvel-home- main page 1개 실행
- Service : (name)
marvel-service- 단일 진입점 생성
cat pay.yaml의 구성
- ReplicationController : (name)
pay-rc- 결제 page 3개 실행
- Service : (name)
pay-service- 단일 진입점 생성
kubectl apply -f marvel-home.yaml -f pay.yaml
- 위의 두 yaml 파일을 동작시킨다
kubectl get deployments.apps, replicationcontroller
kubectl get svc
- 잘 생성된 것을 확인 가능
Ingress 동작
cat ingress.yaml
- (name)
marvel-ingress
kubectl apply -f ingress.yaml
- ingress 동작시키기
kubectl get ingress
marvel-ingress가 잘 생성된 것을 확인 가능
kubectl dsecribe ingress marvel-ingress
marvel-ingress를 보다 자세히 확인 가능- Ingress Rule도 확인 가능
kubectl get svc ingress-nginx-controller
- ingres-nginx-controller의 node port 확인하기 ( 80:30100 )
[ 접속하기 ]
curl node1.example.com:30100/
- main 페이지로 접속
curl node1.example.com:30100/pay
- pay 페이지로 접속