
[따배쿠] 13. Label, Annotation
( 참고 : 따배쿠 https://www.youtube.com/watch?v=6n5obRKsCRQ&list=PLApuRlvrZKohaBHvXAOhUD-RxD0uQ3z0c )
Contents
- Label 이란
- Worker Node에 Label 설정
- Label과 Annotation
- Label을 이용한 카나리 배포
1. Label 이란
- (node를 포함하여) pod, deployment 등 “모든 리소스에 할당”
- Selector를 이용하여 선택
- key-value쌍으로 적용됨
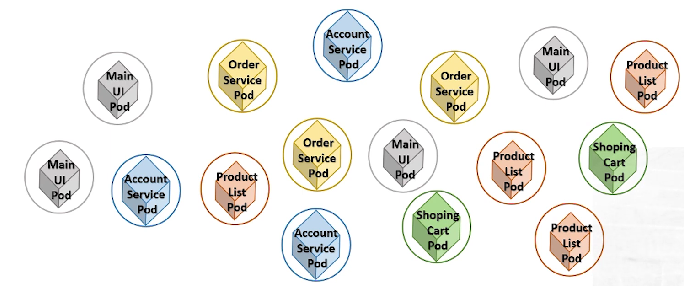
example ( key=value )
name=mainuirel=stable- …
아래와 같이, 여러 label을 사용하여 pod를 쉽게 관리할 수 있음
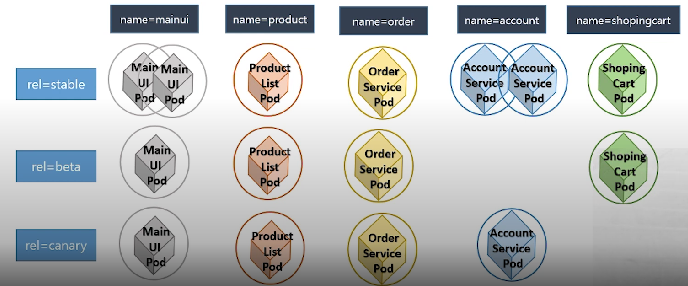
Label & Selector
- ex) release가 stable인 pod를 10개 실행해줘! (
rel:stable)
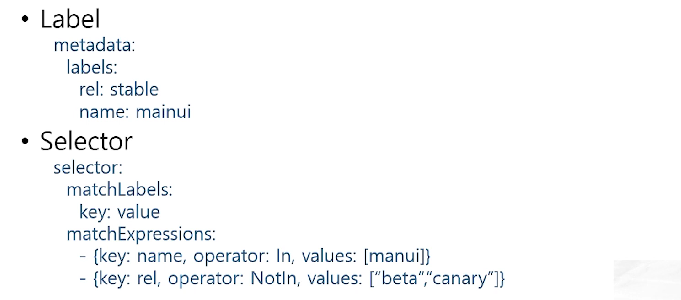
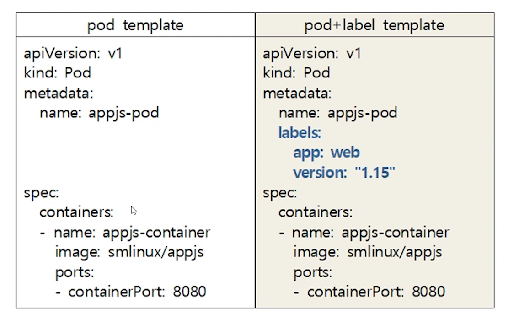
Label Template
-
key & value 사이에는 한 칸의 blank
-
단순 문자열의 경우, ““가 없어도 됨
( 예외 : TRUE, FALSE, YES, NO )
Label 관리 명령어
Label 보기
kubectl get pods --show-labelskubectl get pods -l <label_name>
Label 관리 ( kubectl label --help )
- Label 생성/변경
kubectl label pod <pod_name> key=valuekubectl label pod <pod_name> key=value --overwrite
- Label 확인
kubectl label pod <pod_name> --show-labels
- Label 제거
kubectl label pod <pod_name> key-
실습
1) kubectl run cmdpod --image=nginx:1.14 --port=80
- cmdpod 생성
2) cat > pod1.yaml
- pod1이라는 “레이블 없는” YAML 파일 생성
- 이름 :
pod_demo
3) cp pod1.yaml pod2.yaml & pod2.yaml 수정 (레이블 추가)
- pod2라는 “레이블 있는” YAML 파일 생성
- 이름 :
label_pod_demo - key : value
- 1)
name: mainui - 2)
rel: stable
- 1)
4) kubectl create -f pod1.yaml -f pod2.yaml
- 위의 두 pod 생성
kubectl get pods로 잘 생성된 것 확인
5) kubectl get pods --show-labels
- “label 정보를 포함”하여 pod를 확인
- 3개의 pod 확인 가능
- 1)
cmdpod: (레이블 정보) run=cmdpod - 2)
label-pod-demo: (레이블 정보) name=mainui, rel=stable - 3)
pod-demo: (레이블 정보) 없음
- 1)
6) kubectl get pods -l name=mainui
( = kubectl get pods --selector name=mainui )
- name이 mainui인 레이블을 가진 pod만 확인
7) kubectl label pod pod-demo name=test
- label을 생성
- pod-demo라는 pod에
name=test라는 label을 생성
8) kubectl label pod pod-demo name=test2 --overwrite
- label을 변경 (덮어쓰기)
9) kubectl label pod pod-demo -name
- label을 제거
- pod-demo에서, name이라는 key를 가진 label을 제거
한 줄 요약 : Selector를 사용하여, label을 조건을 걸어서 선택 가능!
2. Worker Node에 Label 설정
Node Label
- “worker node의 특성”을 label 로 설정
kubectl label nodes <node이름> <key>=<value>
- node를 선택하여 pod를 배치 가능!
- ex) DL 돌릴때, GPU가 있는 node로 할당해주기 위해!
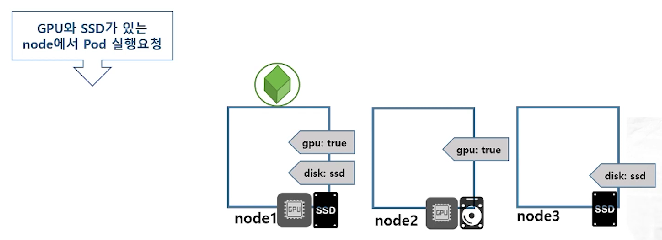
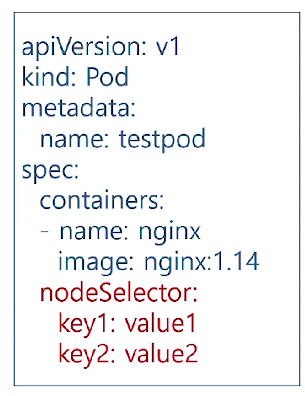
- 위 pod를 실행할 때, 어떠한 node에서 실행될 지
nodeSelector를 통해 지정
명령어
- 위에서 pod와 하는 것과 동일!
- 단지
pod만node로 바꾸면 됨
kubectl get nodes -L disk,gpu
-L을 통해, label의 key를 지정하여 정보 확인 가능

3. Label과 Annotation
- label과 동일하게,
key-value쌍으로 리소스의 특성을 기록 - label vs annotation
- label : 필터링/선택 용
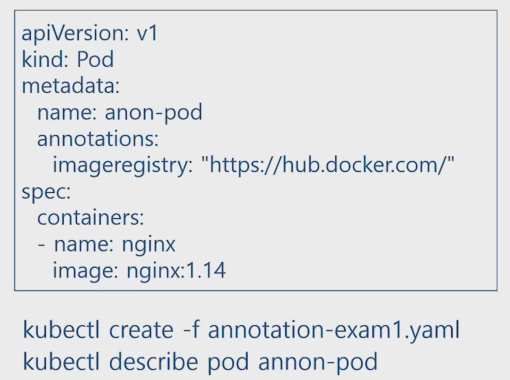
- annotation : “정보 전달” 용
- ex) Deployment의 rolling update 정보 기록
annotations : kubernetes.io/change-cause: version 1.15
- 관리를 위해, “필요한 정보를 기록”할 용으로!
- ex) 릴리즈, 로깅, 모니터링에 필요한 정보들 기록
example)
4. Label을 이용한 카나리 배포
Application을 배포하는 방법
- 1) 블루 그린 업데이트
- 블루 = OLD
- 그린 = NEW
- 2) 카나리 업데이트
- 3) 롤링 업데이트
카나리(Canary) 배포
-
기존 버전을 유지한 채로, 일부 버전만 신규 버전으로 올려서,
신규 버전에 버그/이상이 없는지 확인
example)
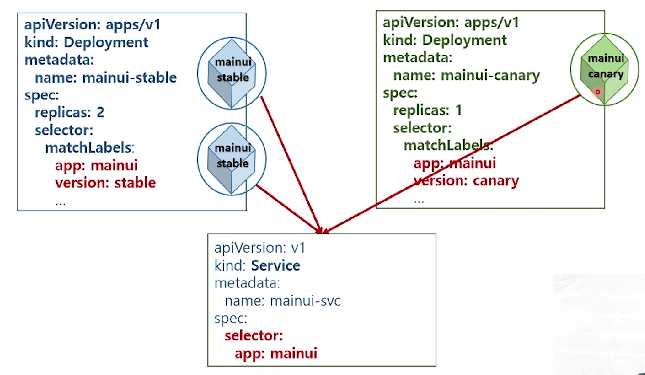
- 블루(old) 버전의 deployment ( replicas = 2 )
- version : stable
- 그린(new) 버전의 deployment ( replicas = 1)
- version : canary
고객은 이 3개의 pod 중 하나로 할당받아 접속될 것이다.
만약 문제 없이 잘 작동된다면, “green 제품 +1”
실습
[blue] kubectl create -f mainui-stable.yaml
kubetl get pods
- 2개의 stable pod 실행 중임을 확인
kubectl create -f mainui-service.yaml
- 단일 진입점 생성
- selector :
app:mainui
kubectl describe service mainui-svc
- 2개의 pod가 연결되어있음을 확인
[green] kubectl create -f mainui-canary.yaml
- 신규 기능을 추가한 새로운 pod 추가
- 얘도 자동으로 위에서 생성한
mainui-svc서비스에 연결됨
kubectl describe service mainui-svc
- 3개의 pod가 연결되어있음을 확인
kubectl get deployments.apps
- 총 2개의 deployments (각각 2개, 1개의 pod)가 작동중임을 확인 가능
- 1)
mainui-stable - 2)
mainui-canary
- 1)
kubectl scale deployment mainui-canary --replicas=2
kubectl scale deployment mainui-stable --replicas=1
- 신규(green) + 1
- 기존(blue) - 1